Learning how to connect your DStv decoder to your TV is a straightforward job that takes only a few minutes once you know which cable goes where. Whether you are setting up a brand-new decoder or sorting out a connection that has stopped working, this guide walks you through every step in plain language. We have wired up thousands of South African homes, so the order below is the same one our installers follow on site. Get the cable right, choose the correct input, and you will be watching in no time.
- HDMI is the recommended cable for connecting a DStv decoder to a modern or smart TV — it carries high-definition video and audio on one lead.
- Older TVs and decoders without HDMI use the red, white and yellow AV (composite) cable instead.
- After cabling, you must select the matching input source (HDMI 1, AV, etc.) on your TV remote or you will see “No Signal”.
- A “No Signal” message is almost always a loose cable or the wrong input — not a faulty decoder.
- Power the decoder, confirm the picture, then activate your subscription with your smartcard number.
What You Need Before You Start
Before you connect your DStv decoder to your TV, get everything within reach so you are not crawling behind the unit twice. Most of this comes in the box with a new decoder.
Equipment checklist
- DStv decoder
- Your TV
- An HDMI or AV cable (depending on the ports on your TV and decoder)
- Power cables for both the TV and the decoder
- The decoder remote control
Choosing the right cable
The cable you use depends on the ports your equipment has. There are two common options:
- HDMI cable — the most common and recommended lead for connecting your decoder to your TV. It carries high-definition video and audio on a single cable.
- AV cable — if your TV or decoder has no HDMI port, use an AV cable. It has red, white and yellow connectors that carry the audio and video signals separately.
Make sure you have the cable that matches your connection type before you go any further. If your decoder will not power on at all once cabled, that points to a hardware fault rather than a cabling mistake — our decoder repair and replacement service can diagnose it.
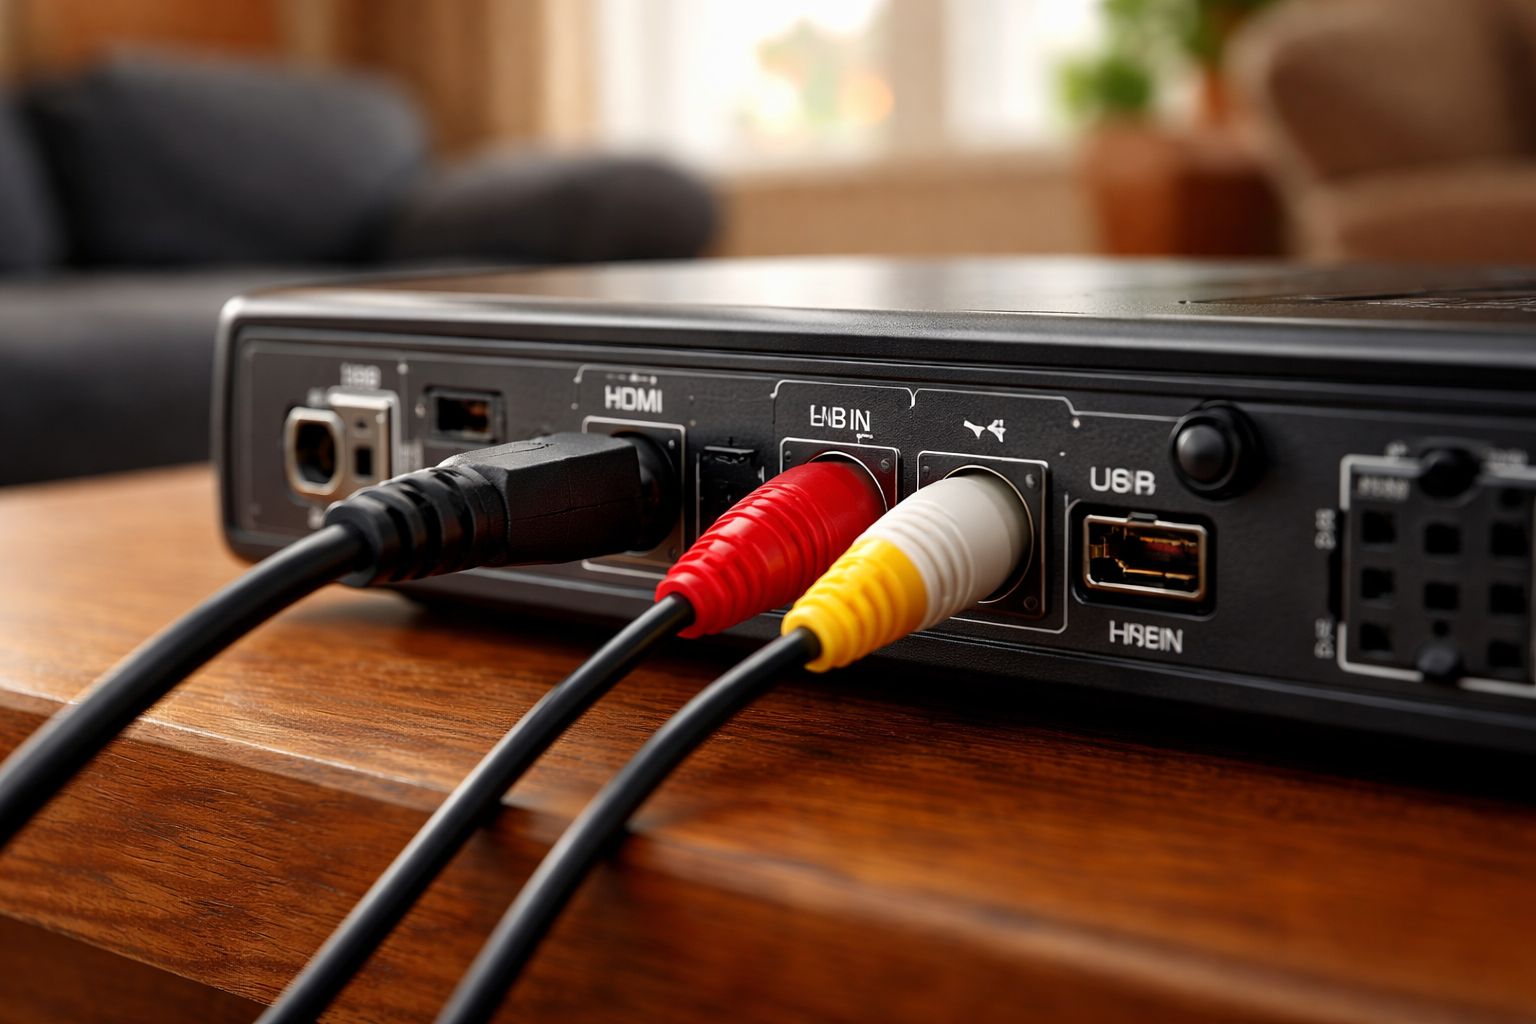
Finding the HDMI and AV Ports
Before you plug anything in, find the matching ports on both devices. You will connect the cable between these two points to carry the signal from the decoder to the screen.
The HDMI port on your TV
If your TV has an HDMI port, it is usually on the back or side of the set. Look for a small flat rectangular socket labelled “HDMI”. It is often numbered — HDMI 1, HDMI 2 and so on — which tells you the input source to select later, so make a note of the number you use.
The HDMI port on your decoder
The HDMI port on your DStv decoder sits on the back or side of the unit, marked “HDMI” or with a similar symbol. If you have an older decoder model without an HDMI port, you will need to use the AV ports instead.
The AV ports
If neither device has HDMI, you will connect with AV cables. The AV ports are colour-coded red, white and yellow on both the TV and the decoder — look for the matching cluster of three sockets on the back or side. Once you have located the ports on both devices, you are ready to connect the cable.
Connecting the Cable
With the ports located, the connection itself takes seconds. Follow the steps for the cable type you are using.
Connecting with an HDMI cable
- Locate the HDMI port on your TV and the HDMI port on your decoder.
- Insert one end of the HDMI cable into the HDMI port on your decoder.
- Insert the other end of the HDMI cable into the HDMI port on your TV.
That is the HDMI connection done.
Connecting with an AV cable
- Locate the AV ports on your TV and on your decoder.
- Identify the colour-coded plugs on the AV cable: yellow for video, white for left audio and red for right audio.
- Insert the yellow plug into the yellow AV port on both the TV and the decoder.
- Insert the white plug into the white AV port on both devices.
- Insert the red plug into the red AV port on both devices.
Your AV connection is now complete. If your TV only has a VGA port, you can use a VGA-to-HDMI converter cable, which converts the signal into a format the connection can read.
Video: Pbteck Info — connecting an Explora decoder to a TV.
How to Connect DStv to a Smart TV and Select the Input
Connecting to a smart TV is no different at the cable stage — a smart TV connects to a DStv decoder over the same HDMI port it uses for everything else. The step people miss is telling the TV to look at that port. Once the cable is in, you need to select the correct input source or the screen stays blank.
Step through the input menu
- Turn on your TV and make sure it is ready for use.
- Open the input/source menu. Using your TV remote, find the button labelled “Input”, “Source” or “AV” and press it.
- Select the matching source. You will see a list of inputs. Choose the HDMI or AV port you plugged the decoder into — this is where the HDMI number you noted earlier pays off. Use the arrow buttons to highlight it, then press “OK” or “Enter”.
- Confirm the picture. Your screen should now show the DStv menu or a live channel. If it does not, double-check you picked the right input and that the decoder is powered on.
If the picture appears but channels are missing, that is a separate fix — see our guide on restoring missing channels on DStv.
Powering and Activating the Decoder
With the picture showing, the last job is power and activation. This is also the stage where a first-time decoder gets linked to your subscription.
Connecting the decoder to power
- Make sure both the TV and decoder are switched off before you begin.
- Plug one end of the supplied power adapter into the “DC IN” port on the back of the decoder.
- Plug the other end into a power outlet and switch the outlet on.
Some decoders have a built-in power supply and do not use a separate adapter — in that case the power cord plugs straight into the wall.
Switching on and activating
- Turn on the TV with the TV remote, set to the input source you connected the decoder to.
- Turn on the decoder with the DStv remote — if nothing happens, you may need to switch the remote back to TV1 so it controls the right unit. A welcome screen or activation prompt should appear.
- Enter your activation details, such as your smartcard number or account details, and follow any on-screen prompts to finish.
Cable Options at a Glance
Different cables suit different setups. Use the table below to pick the right one for the ports you have, then read the notes underneath for the detail.
| Cable | Carries | Best for | Connectors |
|---|---|---|---|
| HDMI | HD video and audio on one lead | Modern and smart TVs | Single flat HDMI plug each end |
| AV (composite) | Standard video and stereo audio | Older TVs or decoders without HDMI | Yellow (video), white + red (audio) |
| VGA-to-HDMI converter | Converted video signal | TVs with only a VGA port | VGA one end, HDMI the other |
HDMI — High Definition Multimedia Interface — is the widely used standard and gives the clearest, crispest picture. The AV or composite cable is the colour-coded fallback, with red and white for audio and yellow for video. Always check that your cable is compatible with both your decoder and your TV, and consult the user manuals if you are unsure which the manufacturer recommends.
Troubleshooting: No Signal and Poor Picture
Most connection problems come down to a handful of causes. Work through these before assuming anything is broken.
No signal on the TV
- Check the cables. Make sure every cable is pushed fully home at both the TV and the decoder. A half-seated HDMI plug is the most common culprit.
- Restart the decoder. Switch it off, unplug it from the wall, wait a few seconds, then plug it back in and power on.
- Check the input source. Use the TV remote to open the input/source menu and confirm you have selected the HDMI or AV input the decoder is plugged into.
Poor picture quality
- Check the cable quality. Use good HDMI or AV cables; a poor-quality lead can degrade the picture.
- Adjust the TV settings. Open the picture menu and tweak the brightness, contrast and sharpness.
- Check signal strength. Make sure your dish or antenna is properly positioned and aligned for a strong signal.
- Contact DStv support. If none of the above helps, get in touch with DStv for further assistance.
When to Call an Installer
Connecting a decoder to a TV is well within reach for most people. But some jobs are safer and faster in professional hands — anything involving the satellite dish, the LNB on the roof, or repeated “No Signal” faults after you have checked every cable and input. If you are dealing with rooftop work, signal alignment or a decoder that simply will not boot, our DStv installers in Johannesburg and surrounding suburbs are happy to help.
You can read more about what we do across the country on our DStv installation home page, or get straight onto WhatsApp for a quote. Doing the cabling yourself saves a call-out; knowing when to hand it over saves a wasted afternoon.
Further reading
Need Professional DSTV Installation?
Our accredited installers offer same-day service across South Africa.